Your all-in-one solution for storewide discounts in WooCommerce. Schedule, customize, and control sales with precision. Include or exclude products, categories, and user rules, and notify customers in real-time via the top bar and pop-up.
Installation
↑ Back to topThe easiest way to start using a product from WooCommerce.com is to use the “Add to store” functionality in the order confirmation page or the My Subscriptions section in your account.
- Navigate to My Subscriptions
- Find the “Add to store” button next to the product you’re planning to install
- Follow the instructions on the screen, and the product will be automatically added to your store.
Alternative options and more information at:
Managing WooCommerce.com subscriptions.

Setup and Configuration
↑ Back to topAfter installing and activating the Storewide Sale for WooCommerce plugin, a new Storewide Sale option will appear in the WooCommerce settings menu. This feature allows you to run time-based sales across your entire store or selected products and categories with ease.
You can easily set up the sale by choosing a discount type, adding the amount, and picking whether it applies to regular or sale prices. You can also select a start and end time, decide which user roles can see the sale, and apply it to specific products or categories. To grab attention, simply enable customizable topbar and popup notifications, ensuring your customers never miss a deal.
Setting Up Storewide Sale For WooCommerce (Rule Creation)
↑ Back to topSet Rules
↑ Back to topGo to WooCommerce > click Storewide Sale to access and manage all your storewide discount rules in one place. From here, you can view, add, edit, or delete sale rules based on your store’s needs.
By clicking on the Add New Rule button, you’ll be able to configure discount settings using the available options, such as:
- View all product refund rules in a log
- Execute bulk actions
- Change the status of each rule
- Take action to edit or delete the rule
While creating a new rule, click on “Add New Rule” and fill in all the necessary information as follows:
General Settings
↑ Back to topThese options allow you to create and control the storewide sale.
- Enable/Disable Storewide Sale: Toggle this option to activate or deactivate the entire storewide sale.
- Sale Type: Choose the type of discount to apply:
- Percentage (%): e.g., 10% off
- Fixed Amount: e.g., $5 off
- Sale Amount: Enter the value of the discount. The input format depends on the Sale Type selected.
- Price Type: Select whether the discount should apply to the Regular Price or Sale Price of the products.
- Sale Schedule: Set the date and time when the sale starts and ends.
- Sale Start Date & Time
- Sale End Date & Time

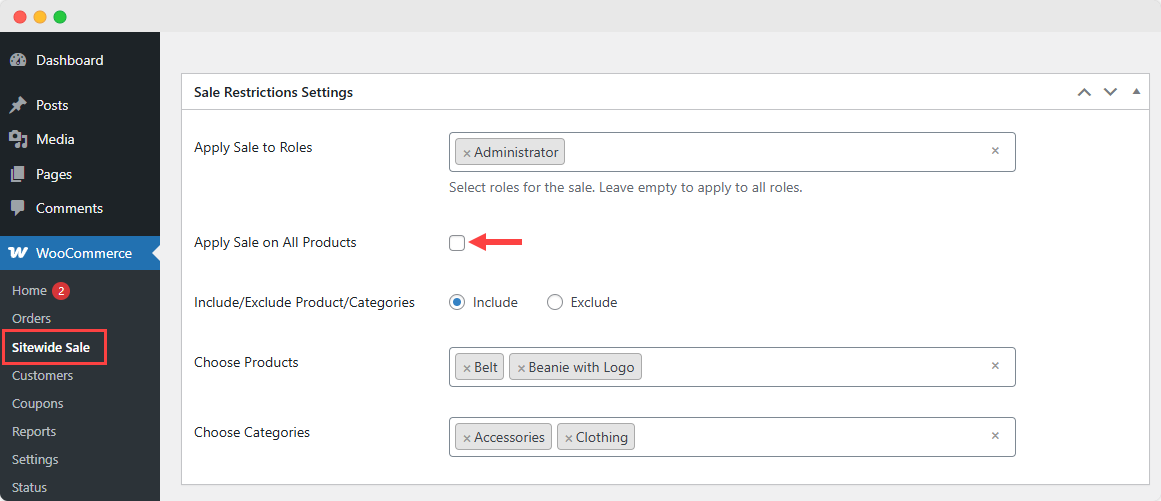
Sale Restrictions Settings
↑ Back to topThese options help you control which users and products the sale applies to.
- Apply Sale to User Roles: Choose specific WordPress user roles (e.g., Administrator, Customer, Guest) that the sale should apply to. Leave blank to allow all roles.
- Apply Sale on All Products: Enable this if the discount should apply to every product in your store.
- Include/Exclude Products and Categories: Use the toggle to switch between “Include” or “Exclude” mode.
- Choose Products: Select specific products to include/exclude.
- Choose Categories: Select product categories like Accessories, Clothing, Hoodies, etc.
Configure Storewide Sale For WooCommerce Settings
Go to WooCommerce, open the drop-down menu, and choose the Settings section. You will land on the page where the Storewide sale will appear. Simply click and configure further plugin settings. The following are settings explained:
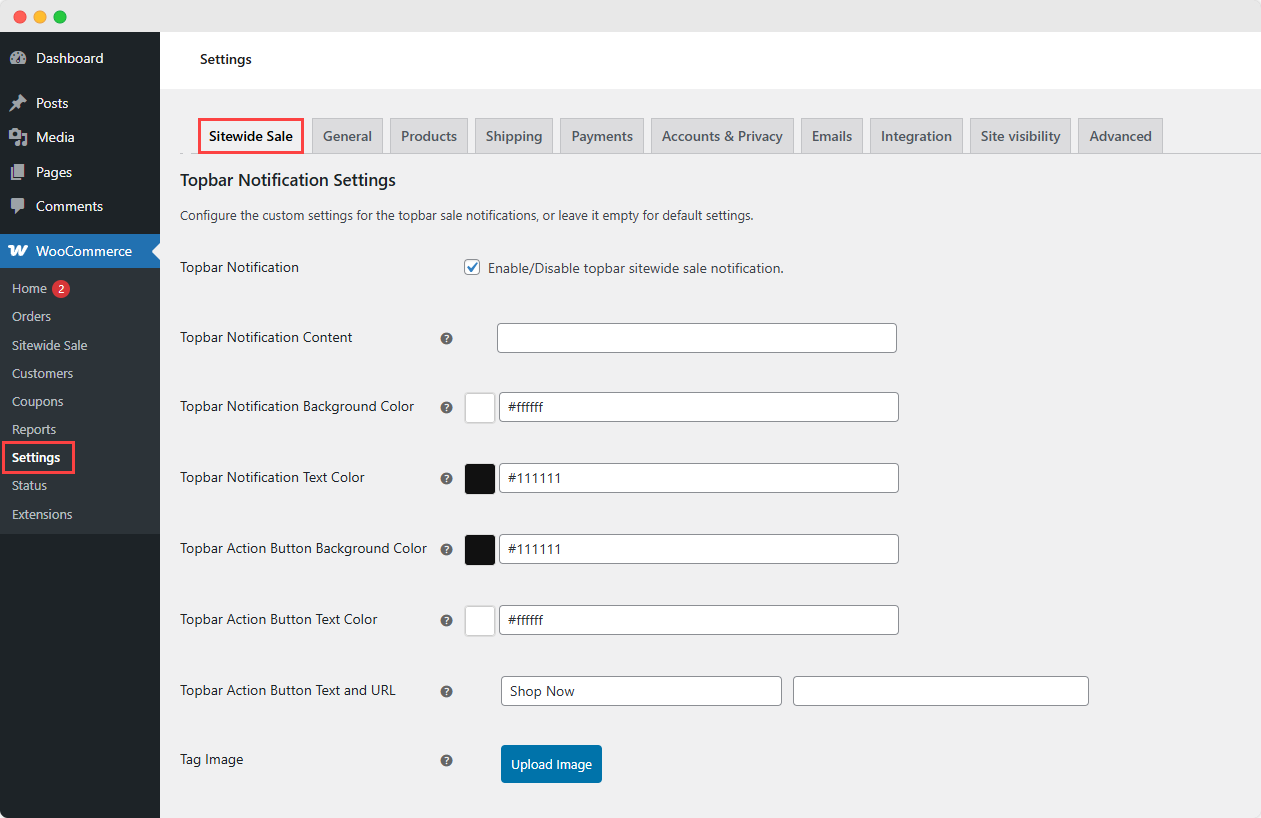
TopBar Notification Settings
↑ Back to topDisplay a promotional bar at the top of your store during the sale.
- Topbar Notification: Enable/Disable the topbar alert.
- Topbar Notification Content: Customize the text shown in the topbar. This is typically a message like “Big Sale! Up to 20% Off”.
- Topbar Notification Background Color: Set the topbar’s background color.
- Topbar Notification Text Color: Set the color of the message text.
- Topbar Action Button Background Color: Choose the background color of the button (e.g., Shop Now).
- Topbar Action Button Text Color: Set the button’s text color.
- Topbar Action Button Text and URL: Choose the action button text and URL, like;
- Text: Enter call-to-action text like “Shop Now”.
- URL: Provide the link to your shop or sale page.
- Tag Image (Optional): Upload a small image or badge that appears in the topbar.
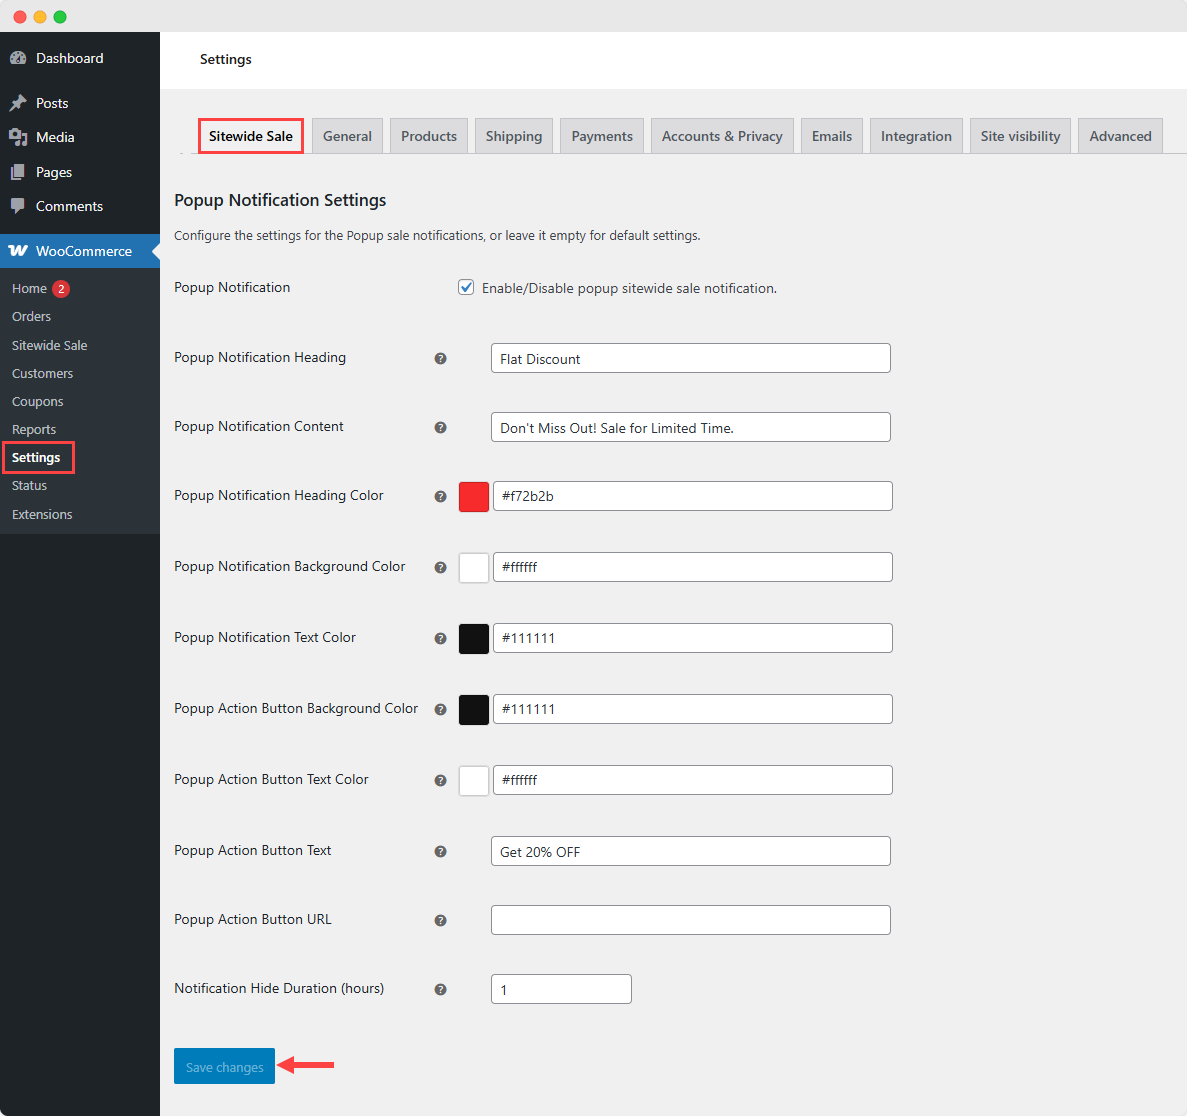
Popup Notification Settings
↑ Back to top- Popup Notification: Enable or disable the storewide popup notification on your site.
- Popup Notification Heading: Enter the title text that appears at the top of the popup (e.g., “Big Sale!”).
- Popup Notification Content: Add a message that appears below the heading to describe the offer (e.g., “Get 10% OFF – Limited Time Only!”).
- Popup Notification Heading Color: Choose the color of the heading text in the popup.
- Popup Notification Background Color: Set the background color of the entire popup.
- Popup Notification Text Color: Define the color of the popup content/message text.
- Popup Action Button Background Color: Set the background color of the button inside the popup.
- Popup Action Button Text Color: Set the color of the text on the popup button.
- Popup Action Button Text: Customize the text shown on the action button (e.g., “Get 10% OFF”).
- Popup Action Button URL: Add the link where users will be directed after clicking the button (e.g., https://example.com).
- Notification Hide Duration (hours): Set how many hours the popup should remain hidden after a user closes it (e.g., 2).
- Save Changes: Click this button to apply and store all popup settings.